Achieving Scalability in Node.js Applications
Proven Methods and Tools


Introduction
Node.js has become a popular choice for building web applications due to its non-blocking and event-driven architecture.
However, as your application grows and faces increased traffic, achieving scalability becomes crucial.
This article aims to explain clearly, the different methods and tools for achieving scalability in Node.js applications.
This article is specifically targeted at:
- Node.js backend developers
Prerequisites
This article requires the following:
Experience with JavaScript and Node.js.
An installation of Node.js.
Definition of Scalability
Scalability is the ability of an application to handle a growing number of users concurrently without compromising on its functioning and causing disruptions to user experience.
It involves designing a system in a way that allows it to grow seamlessly as demand increases.
A scalable web application is capable of handling increased workloads such as:
growing numbers of users
growing number of requests
growing volume of data
Proven Methods for Achieving Scalability
The following methods are viable ways to achieve scalability in Node.js:
Load balancing: A load balancer is software that distributes network or application traffic between many servers. It prevents any single server from becoming a bottleneck and provides better performance and availability.
Horizontal scaling: Node.js is well-suited for horizontal scaling. Horizontal scaling is where you add more nodes to handle increased load.
Caching: This entails caching frequently used data so that it can be easily retrieved when required. By doing so, the database load can be lessened and the application's performance can be enhanced.
Microservices Architecture: A microservices-based application is broken down into smaller components based on a logical construct. Breaking your application into microservices allows you to scale individual components independently. Each microservice can be developed and scaled separately, improving resource utilization.
Database Optimization: At certain times, querying the database is the only choice. Optimize your database queries, utilize indexing, and consider techniques like database replication or sharding to distribute
the database loads across multiple servers.
Content Delivery Networks (CDNs)
Serverless architecture: Serverless architecture is an approach to application development where the application is built using functions that are executed on-demand in a cloud environment. Platforms like AWS and Azure automatically scale compute resources based on incoming requests, reducing operational overhead.
Load Balancing

A load balancer distributes incoming HTTP requests across multiple Node.js instances running on different servers.
Load balancers improve performance and reliability by ensuring that no single instance becomes overloaded with requests.
The decision to receive requests is based on various algorithms like:
Round Robin: A fresh request is sent to another server on a list.
Least Connections: The server with the fewest active connections receives a new request.
IP Hashing: A hash of the IP address of the client is used to send a new request to the server.
Two commonly used methods include the following:
Reverse Proxy: The proxy server distributes incoming requests based on the chosen load-balancing strategy. Examples include:
Nginx
HAProxy
The following code snippet shows how to use Nginx in this case:
Assuming you have two Node.js instances running on localhost at ports 3000 and 3001, and you want to distribute incoming requests evenly between them:
Create an Nginx configuration file. For example, you can create a file named
nginx. confin the/etc/nginx/sites-available/directory for Ubuntu-based systems.Edit the configuration file with a text editor. Here's an example:
nginx

http {

upstream nodejs\_servers {

server [localhost:3000](http://localhost:3000);

server [localhost:3001](http://localhost:3001);

}

server {

listen 80;

server\_name your\_domain.com; # Replace with your domain or server IP

location / {

proxy\_pass [http://nodejs\_servers](http://nodejs_servers);

proxy\_set\_header Host $host;

proxy\_set\_header X-Real-IP $remote\_addr;

proxy\_set\_header X-Forwarded-For $proxy\_add\_x\_forwarded\_for;

}

}

}
In this configuration:
- upstream nodejs_servers defines the list of Node.js instances you want to load balance.
- server_name should be replaced with your actual domain name or server IP address.
- The location/block specifies how to handle incoming requests. It forwards requests to the nodejs_servers upstream defined earlier.
Save the configuration file and exit the text editor.
Create a symbolic link to enable the configuration:
sudo ln -s /etc/nginx/sites-available/nginx.conf /etc/nginx/sites-enabled/
- Test the Nginx configuration for syntax errors:
sudo nginx -t
- If there are no syntax errors, reload Nginx to apply the changes:
sudo service nginx reload
Now, Nginx will act as a reverse proxy, distributing incoming HTTP requests to the Node.js instances running on ports 3000 and 3001.
- Application load balancers: Cloud providers offer managed load balancers that can distribute traffic to multiple instances of your Node.js application.
Horizontal scaling
Horizontal scaling means adding additional nodes or machines to the infrastructure to cope with new demands.
The main factors to choose horizontal scaling for:
Unable to access our application if the web server goes down.
Many users access the web server simultaneously and it reaches the web server’s load limit.
Users experience slower responses or fail to connect to the server
Implementing horizontal scaling for a Node.js application to achieve clustering typically involves using a process manager like PM2.
PM2 automatically runs Node.js apps in cluster mode.
Here's a simplified code example to demonstrate this concept:
- First, ensure you have PM2 installed. If not, you can install it globally using npm:
npm install pm2 -g
- Create a basic Node.js application.
// app.js

const http = require('http');

const port = process.env.PORT || 3000;

const server = http.createServer((req, res) => {

res.writeHead(200, { 'Content-Type': 'text/plain' });

res.end('Hello, Node.js Horizontal Scaling!\\n');

});

server.listen(port, () => {

console.log(\`Server is running on port ${port}\`);

});
Save this code in a file named
app.js.Now, you can use PM2 to horizontally scale this application. Open your terminal and navigate to the directory containing
app.js.Start multiple instances of your Node.js application using PM2:
pm2 start app.js -i 4
This command starts four instances of your Node.js application. You can adjust the -I flag to specify the number of instances you want.
- To monitor the status of your application instances, you can use the following command:
pm2 list
- If you want to scale up or down dynamically, you can use PM2's scaling features. For example, to scale up to 6 instances:
pm2 scale app +2
To scale down to 3 instances:
pm2 scale app 3
PM2 will automatically manage the scaling instances, including monitoring and restarting them if they fail.
Adapt the example above to your actual application's needs and deployment environment.
Caching
The concept is that future requests for frequently requested data that is kept in a cache can be swiftly fulfilled and are often quicker than querying the database.
A cache layer is a more efficient way of reusing previously retrieved or computed data.
Here's how to use caching to scale a Node.js application:
Choose a Caching Solution: Decide on a caching solution that fits your application's needs. Common options include:
In-Memory Caching: Use a JavaScript in-memory caching library like
node-cacheormemory-cacheto store data in memory. This is suitable for caching data that doesn't need to persist across application restarts.Distributed Caching: For a multi-server or distributed environment, consider using tools like Redis or Memcached. These solutions provide fast, distributed caching with persistence.
Install and Configure Your Caching Solution: Depending on your choice, install and configure the caching solution in your Node.js application. For example, if you're using Redis, install the
Redispackage and set up a connection to your Redis server.Identify Cacheable Data: Determine which parts of your application can benefit from caching. Common options include
database query results
API responses
computed data that doesn't change frequently.
Implement Caching in Your Code: Modify your Node.js application code to use caching. Here's a simplified example using an in-memory cache with the
memory-cachelibrary:
const cache = require('memory-cache');

const express = require('express');

const app = express();

// Middleware to check the cache before processing a request

app.use((req, res, next) => {

const key = req.url; // Use the request URL as the cache key

const cachedData = cache.get(key);

if (cachedData) {

// If data is cached, return it

res.send(cachedData);

} else {

// If not cached, continue with the request and cache the response

res.sendResponse = res.send;

res.send = (body) => {

cache.put(key, body, 60000); // Cache data for 1 minute

res.sendResponse(body);

};

next();

}

});

// Your route handling code here...

app.listen(3000, () => {

console.log('Server is running on port 3000');

});
The code snippet above uses the memory-cache library to cache responses for 1 minute. Adjust the caching duration according to your requirements.
Set Cache Expiration and Invalidation Rules: Determine when cached data should expire or be invalidated. You can set cache expiration times (as shown in the code example) or implement cache invalidation based on specific events or changes to the underlying data.
Monitor and Tune: Continuously monitor your application's performance and cache utilization. Adjust caching strategies and cache durations as needed to optimize performance.
Microservices Architecture
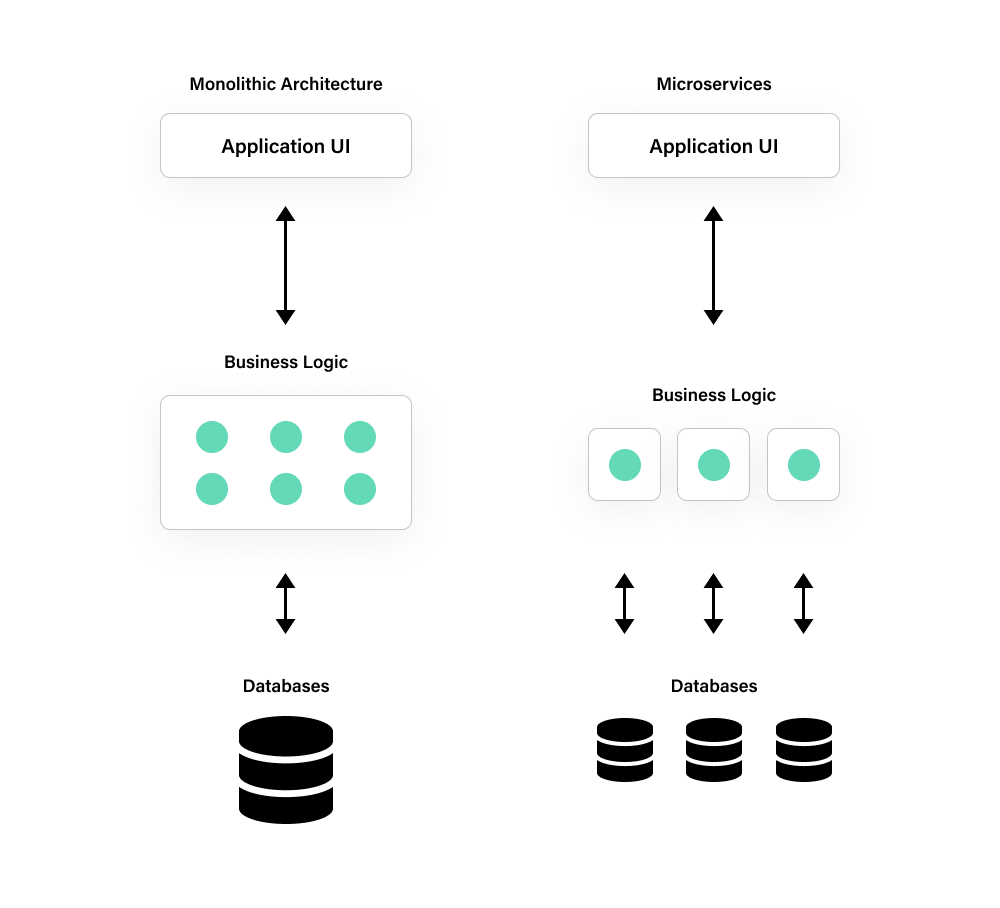
Node.js’ non-blocking and event-driven architecture aligns well with the microservices principles.
The following is a step-by-step guide on how to create a microservice using Node.js:
Design Your Microservice: Before writing code, define the purpose and functionality of your microservice. Determine what specific task or service it will provide within your application ecosystem.
Initialize a Node.js Project: Start by creating a new directory for your microservice and initializing a Node.js project within it. Open a terminal and run:
mkdir your-microservice

cd your-microservice

npm init -y
- Install Dependencies: Depending on your microservice's functionality, you may need to install third-party packages using npm. For example, if you're creating a web API, you might install Express.js:
npm install express
You can also install other packages as per your requirements, such as
database connectors
HTTP clients
logging libraries.
- Create Your Microservice: Write the code for your microservice in a JavaScript file (e.g.,
app.js). Here's a simple example using Express.js for a basic HTTP microservice:
const express = require('express');

const app = express();

const port = process.env.PORT || 3000;

app.get('/', (req, res) => {

res.json({ message: 'Hello, Microservice!' });

});

app.listen(port, () => {

console.log(\`Microservice is running on port ${port}\`);

});
Define Configuration: Consider using environment variables or a configuration file to manage settings specific to your microservice, such as port numbers, database connection strings, or API keys.
Implement Logging and Error Handling: Implement proper error handling and logging within your microservice to make debugging and monitoring easier. You can use libraries like Winston or Bunyan for logging.
Testing: Write unit tests and, if applicable, integration tests for your microservice. Use testing frameworks like Mocha, Chai, or Jest.
Dockerize Your Microservice (Optional): Containerization is beneficial for deploying microservices. Create a
Dockerfilein your project directory to package your microservice into a Docker container.Documentation: Provide clear documentation for your microservice's API, including endpoints, request/response formats, and any authentication requirements.
Deployment: Deploy your microservice to your chosen hosting environment, whether it's a cloud service, a container orchestrator like Kubernetes, or a traditional server. Ensure that you can manage scaling and updates effectively.
Monitoring and Scaling: Set up monitoring and scaling solutions to manage the performance and availability of your microservice. A tool like Prometheus can help with this.
Security: Include the following
input validation
authentication
authorization.
to ensure that your microservice's dependencies are kept up to date to mitigate security vulnerabilities.
Continuous Integration/Continuous Deployment (CI/CD): Implement CI/CD pipelines to automate the testing and deployment of your microservice.
Following the steps above helps to create a Node.js microservice that can be integrated into a larger microservices architecture to provide specific functionality as part of your application ecosystem.
Database Optimization
The following are ways to optimize databases to scale Node.js applications:
Utilize indexes and avoid SELECT * queries to improve the performance of your queries.
Implement caching strategies to reduce the load on your databases.
Utilize sharding strategies to allocate data among several servers, which will enhance read and write operations.
Reduce the cost of creating new connections by using connection pooling.
To store session data or create real-time features, utilize a NoSQL database like MongoDB or Redis.
Content Delivery Networks (CDNs)
Offload the following static assets to a CDN
images
stylesheets
JavaScript.
CDNs cache content at edge locations closer to users, reducing the load on Node.js servers and improving page load times.
Serverless Architecture
With serverless computing, the cloud provider is responsible for running the server, including:
capacity planning
maintenance
security
scaling
Serverless architecture like:
Google Cloud
Microsoft Azure
AWS Lambda
can automatically scale up and down based on the application’s workload, eliminating the need for manual intervention.
The following code snippets are step-by-step guides on using the AWS Lambda function to go serverless:
Set Up AWS Account: If you don't have an AWS account, sign up for one at https://aws.amazon.com/. Ensure you have the AWS CLI installed and configured with your credentials.
Install Serverless Framework: Install the Serverless Framework globally using npm:
npm install -g serverlessCreate a New Serverless Service: Create a new directory for your service and navigate to it:
mkdir my-serverless-service

cd my-serverless-service
- Initialize a new Serverless service:
serverless create --template aws-nodejs --path my-service
- Write Your Node.js Function: Open the generated
handler.jsfile in themy-servicedirectory and define your Node.js function.
'use strict';

module.exports.hello = async (event) => {

return {

statusCode: 200,

body: JSON.stringify({

message: 'Hello, Serverless World!',

}),

};

};
- Serverless.yml Configuration: The
serverless.ymlfile in your service directory is the configuration file for your service. Modify it as needed, specifying the function, triggers, and any other settings:
service: my-service

provider:

name: aws

runtime: nodejs14.x

functions:

hello:

handler: handler.hello
- Deploy Your Service:
- Deploy your service to AWS Lambda using Serverless Framework:
serverless deploy
- Invoke Your Function:
- After deploying, you can invoke your function locally:
serverless invoke local -f hello
- Test the Deployed Function:
- Use the generated URL to test your deployed Lambda function:
curl [https://your-generated-url.execute-api.us-east-1.amazonaws.com/dev/hello](https://your-generated-url.execute-api.us-east-1.amazonaws.com/dev/hello)
Replace your-generated-url with the actual URL generated during deployment.
This is a basic example of setting up a Serverless Node.js service using the Serverless Framework and AWS Lambda. You can extend this by adding more functions, and triggers, and integrating with other AWS services like API Gateway, DynamoDB, or S3 as needed for your application.
Conclusion
In summary, scaling Node.js applications is essential for handling increased user demand and ensuring a smooth user experience.
By implementing the strategies discussed in this article, scalability and your application's responsiveness will be maintained.
Regularly monitor performance and adapt your scaling strategies as needed to meet the evolving needs of your application and its users.